How to Migrate From Windows to Mac?
Switching from Windows to Mac feels like a big step. You worry about losing files, photos, or important documents. The good news? It does not have to be stressful.
Apple built a simple solution for this exact problem. Migration Assistant moves your accounts, apps, settings, and files to your new Mac. It handles documents, emails, contacts, calendars, and photos too.
This guide walks you through the entire process. You will learn how to prepare your Windows PC before the switch. We cover each step of using Migration Assistant properly.
We also share tips that make your transition smoother. You will discover how to connect your iPhone for a seamless ecosystem experience. Learning basic Mac gestures and shortcuts helps you adjust faster.
Many new Mac users make simple mistakes early on. They skip learning the new interface or forget device protection. This article helps you avoid those common pitfalls.
By the end, you will feel confident using your Mac. Your data stays safe, and your learning curve shrinks. Let us make this switch easy for you.
In a Nutshell
Here’s a quick summary of what you need to know:
-
Migration Assistant is the official Apple tool for this move. It transfers your files, apps, and settings directly from your PC to your new Mac.
-
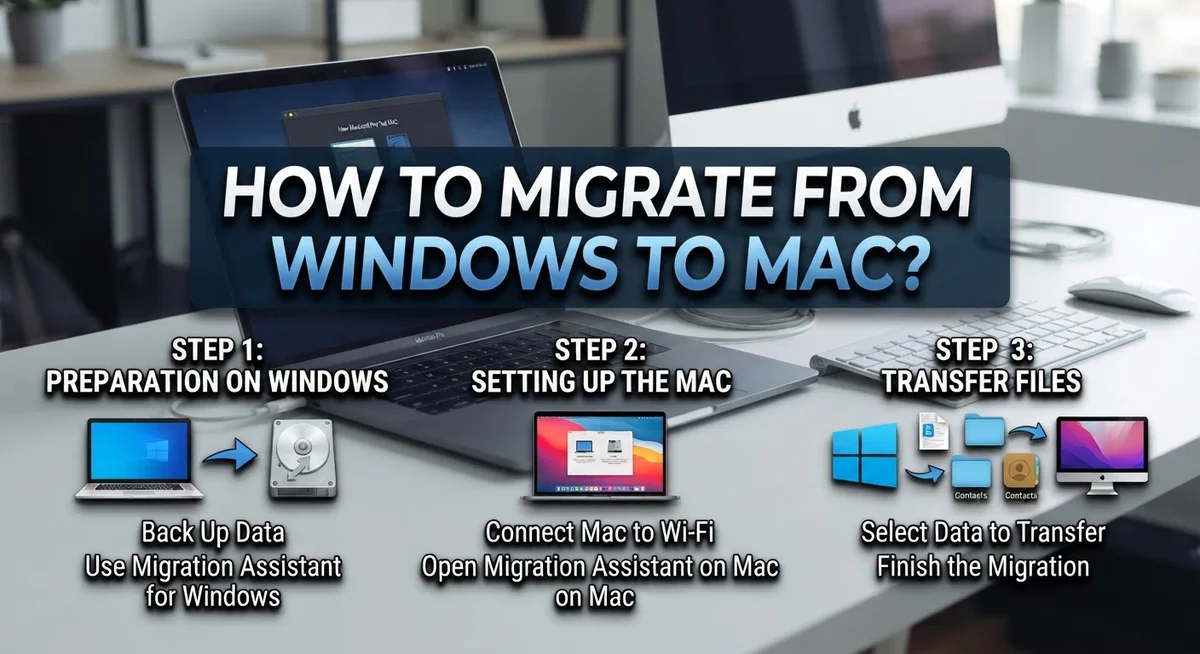
The process starts when you download Windows Migration Assistant on your PC. Your Mac then shows a code, and you enter it to start the transfer.
-
Your documents, photos, contacts, calendars, and email accounts move over automatically. You do not need to copy files manually.
-
Connect your iPhone to your Mac early. This helps you enjoy a smooth, connected Apple ecosystem right away.
-
Take time to learn Mac keyboard shortcuts and trackpad gestures. These differ from Windows and make daily use much easier.
-
Many new users skip learning macOS navigation. This leads to frustration, so spend a few days getting familiar with your desktop layout.
-
Expect a small learning curve at first. Once you adjust, using a Mac feels natural and even faster than before.
Before You Begin: Pre-Migration Checklist
Before you start moving your files, take a few minutes to prepare your Windows PC. This simple step prevents problems later.
Check your Windows PC first. Make sure your computer has enough free space. Migration Assistant works best when your hard drive has at least 10 percent empty room. Delete old files you no longer need. Empty your Recycle Bin completely. This gives the tool plenty of room to work.
Update your Windows system. Install all pending Windows updates before you begin. Your PC should run the latest version available. Updates fix bugs that might interfere with the transfer process.
Organize your files now. Go through your Documents, Pictures, and Downloads folders. Move everything important to one central location. This makes it easier to find your files after migration. Delete duplicate files or old backups you do not need anymore.
Back up your PC completely. Create a full backup of your Windows computer before starting. Use Windows Backup or an external hard drive. If something goes wrong during migration, you have your original files safe.
Know what transfers over. Your user account, applications, documents, photos, email accounts, contacts, and calendars will move to your Mac. Some Windows programs may not work on macOS. Check if your important applications have Mac versions available.
Gather your passwords. Write down passwords for email accounts, Wi Fi networks, and important websites. You will need these on your Mac. Migration Assistant transfers email accounts, but it cannot transfer passwords for security reasons.
Plan your timing. Set aside 2 to 4 hours for the entire process. Do not rush through migration. A calm approach prevents mistakes.
Understanding Migration Assistant: How It Works
Migration Assistant works like a bridge between your Windows PC and Mac. Apple designed this tool to move your personal data automatically. The process is straightforward and requires just a few steps from you.
Here’s how it actually works. First, you download Windows Migration Assistant on your PC. This software prepares your Windows computer to send data to your Mac. Once installed, you launch the program and it displays a unique code on your screen.
Next, you take that code to your Mac. On your Mac, Migration Assistant is already built in. You enter the code from your PC into the Mac version. This connection tells both computers they should trust each other and share data.
Once connected, Migration Assistant scans your PC for files and settings. It identifies what can transfer to Mac. The tool then copies everything to the right locations on your Mac. Your documents go to the Documents folder. Photos move to the Photos app. Email accounts get added to Mail. Contacts appear in your Contacts app.
The actual transfer takes time depending on how much data you have. A small amount of files might take 30 minutes. A large collection could take several hours. Both computers must stay connected during this process.
The beauty of Migration Assistant is automation. You don’t manually drag and drop files. You don’t need to remember where things should go. The tool handles all the organization for you. Your user account settings transfer too, so your Mac feels familiar right away. This is why Apple created this specific tool instead of making you do everything manually.
Step-by-Step: Transferring Your Data From PC to Mac
The transfer process itself is straightforward once you have everything ready. Start by downloading Windows Migration Assistant on your PC. This is Apple’s official tool, and you’ll find it on the migration support page.
Open Migration Assistant on your Mac first. Your Mac will display a unique code on the screen. Take this code to your Windows PC and enter it into the Windows Migration Assistant application. This code creates a secure connection between your two computers.
Make sure both devices stay connected during the entire transfer. Keep them plugged into power and connected to the same Wi Fi network. Interrupting the connection can cause problems with your files.
The tool scans your Windows PC and shows you what it found. You’ll see your user account, documents, photos, email accounts, contacts, and calendars listed. Review this list carefully. You can uncheck items you don’t want to transfer.
Click the transfer button and let Migration Assistant do its work. The time this takes depends on how much data you have. Small transfers might finish in minutes. Large transfers with thousands of files could take several hours or even overnight.
Your Mac will restart during the process. Don’t turn off either computer or disconnect them. Let the tool complete its work without interruption.
Once finished, your Mac displays a completion message. Your files now sit in the correct locations on your Mac. Your documents appear in the Documents folder. Photos go to the Pictures folder. Email accounts are ready to use. Your user account settings transfer over too.
Check everything after the transfer completes. Open a few folders and verify your files are there. Test your email accounts. Make sure your settings feel right.
What Gets Transferred (and What Doesn’t)
When you move from Windows to Mac, some things transfer smoothly while others don’t. Understanding this difference helps you prepare better and avoid surprises after the migration completes.
What transfers over successfully includes your user account with all settings and preferences. Your documents, photos, videos, and music files move to the correct Mac folders automatically. Email accounts, contacts, and calendar entries transfer completely. Many of your applications can move too, though this depends on Mac compatibility.
However, some items don’t transfer. Windows specific software won’t work on Mac because the two operating systems use different architectures. Programs built only for Windows simply cannot run on macOS. Your Windows registry and system settings stay behind since Mac uses a completely different system structure.
Certain files may need attention after transfer. Some older documents formatted for Windows might need adjustment in Mac applications. Your browser bookmarks transfer, but browser extensions may not work depending on the application.
Printer settings and network configurations sometimes require reconfiguration on your Mac. Wireless network passwords transfer, but printer drivers need reinstallation. External device connections may need new drivers or software for Mac.
Game files present another challenge. Many Windows games won’t run on Mac, even if the game publisher released a Mac version. You’ll need to purchase or download Mac compatible versions separately.
The good news is that Migration Assistant handles most transfers automatically. Your important personal data, email, and documents arrive safely on your Mac. The key is knowing what won’t transfer so you can plan accordingly and gather any necessary Mac alternatives before you need them.
Adjusting to macOS: Key Differences From Windows
macOS and Windows operate differently, so understanding these differences helps you adjust faster. The first thing you’ll notice is the menu bar location. On macOS, the menu bar sits at the top of your screen permanently, while Windows places menus inside each window. This takes getting used to, but it becomes natural quickly.
Your keyboard works differently too. The Command key replaces the Control key for most shortcuts. Command+C copies, Command+V pastes, and Command+Q quits applications. The Mac keyboard also lacks a Windows key. Learning these shortcuts prevents frustration when your usual key combinations don’t work.
The trackpad experience differs significantly. Mac trackpads support multi-finger gestures that Windows trackpads don’t. Two-finger scrolling, three-finger swiping between windows, and pinch-to-zoom are standard on Mac. Spend time practicing these gestures because they speed up your workflow considerably.
File organization follows a different structure. macOS uses Finder instead of File Explorer. Your home folder contains Desktop, Documents, Downloads, and other standard folders. The Applications folder stores all your programs, unlike Windows where applications scatter across various locations.
Right-clicking behaves the same way, but the context menus look different and contain different options. This adjustment is minor compared to other changes.
Window management also differs. macOS doesn’t have a traditional minimize to taskbar like Windows. Instead, windows go to the Dock, which sits at the bottom of your screen by default. Closing a window doesn’t quit the application, which confuses many new Mac users.
Taking time to explore these differences prevents mistakes and speeds up your learning curve significantly.
Setting Up Your Apple Ecosystem for a Smooth Transition
Your Apple ecosystem works best when all your devices connect and sync together. This connection makes your transition from Windows smoother and more enjoyable.
Start by connecting your iPhone to your Mac right after the migration completes. Your phone automatically syncs with your Mac through iCloud. This means your contacts, calendars, photos, and apps stay updated across both devices without extra work.
Set up iCloud on your Mac first. Open System Settings and sign in with your Apple ID. Enable iCloud Drive so your documents sync automatically between devices. This creates a central storage location for all your important files.
Your email accounts deserve attention too. Add them to the Mail app on your Mac and iPhone. When you do this, your messages and folders appear on both devices instantly. You won’t miss important emails on either screen.
Photos sync beautifully across your ecosystem. Enable iCloud Photos in your settings. Every photo you take on your iPhone appears on your Mac automatically. Your Mac photos show up on your iPhone too.
Familiarize yourself with Apple’s ecosystem features like Handoff and Universal Clipboard. Handoff lets you start something on your iPhone and finish it on your Mac. Universal Clipboard means you can copy text on one device and paste it on another.
Consider enabling two factor authentication for your Apple ID. This protects all your devices and accounts from unauthorized access. Your security matters when everything connects together.
Take time exploring how these features work together. The ecosystem’s real power comes from understanding how each piece communicates with the others. This knowledge helps you work faster and stay organized across all your Apple devices.
Common Mistakes to Avoid During Migration
Not understanding the differences between Windows and Mac is your biggest mistake. These operating systems work in completely different ways. Jumping into Mac without learning how it functions leads to frustration and wasted time.
Skipping keyboard shortcut learning will slow you down significantly. Mac uses Command key instead of Control key for most functions. You’ll spend extra minutes on tasks that should take seconds. Take time to memorize the most common shortcuts before you start working.
Rushing through the Migration Assistant process causes data loss. Don’t interrupt the transfer or restart your Mac during the process. Let the tool complete its work fully. Patience here saves you from recovering lost files later.
Ignoring device protection planning is risky. Your Mac needs proper physical protection from day one. Plan how you’ll protect it before migration day arrives.
Not checking your transferred files after completion is a critical oversight. Some applications may not transfer perfectly. Certain settings might need adjustment. Spend an hour reviewing everything to catch problems early.
Assuming all your Windows programs work on Mac creates disappointment. Many applications don’t have Mac versions. You’ll need to find Mac alternatives or use other solutions. Research your essential software before migration day.
Neglecting to back up your Windows PC before starting is dangerous. Technical issues can happen during any migration. A backup protects your original data completely. Keep your Windows PC backed up until you’re completely comfortable with your Mac.
Forgetting to organize your files on Mac properly wastes future time. Mac’s file structure differs from Windows. Create a logical folder system that makes sense for how you work. Organizing now prevents searching for files later.
Troubleshooting Migration Issues
When problems occur during your migration, staying calm and methodical helps you solve them quickly. Most issues happen because the two computers lose connection, files don’t transfer completely, or applications don’t work properly on macOS.
Connection problems are the most common issue. Make sure both your Mac and Windows PC stay connected to the same WiFi network throughout the entire process. Keep both devices plugged in and avoid putting them to sleep. If the connection drops, restart Migration Assistant on both computers and start again from the beginning.
Incomplete file transfers happen when you interrupt the process too early. Always let Migration Assistant finish completely before closing it or restarting either computer. The transfer time depends on how much data you have, so patience is essential here.
Some applications won’t work on macOS even though Migration Assistant copies them over. This occurs because many Windows programs aren’t compatible with Apple’s operating system. You’ll need to find Mac alternatives or use cloud based versions instead.
If your email accounts don’t sync properly after migration, check your account settings on the Mac. Some email providers need special setup steps on macOS. Verify your passwords are correct and that two factor authentication isn’t blocking the connection.
Performance issues after migration usually mean you have too many startup applications running. Go into your Mac’s system settings and disable applications you don’t need launching automatically.
When nothing seems to work, back up your Mac data and try Migration Assistant again from scratch. Sometimes a fresh start resolves stubborn problems that don’t respond to troubleshooting. Document any error messages you see so you can reference them if needed.
Final Thoughts
Switching from Windows to Mac feels like a big step. But with the right approach, you make it simple and stress free.
Migration Assistant does the heavy lifting for you. It moves your documents, photos, contacts, and email accounts to your new Mac automatically.
The transfer process itself takes patience. Keep your Mac and PC connected to the same network throughout the entire process.
Give yourself time to learn the new system. Mac keyboard shortcuts and trackpad gestures feel strange at first, but they become natural with practice.
Your Apple ecosystem grows stronger over time. Every device you add makes the experience more connected and convenient.
Don’t rush your first week with the new Mac. Explore menus, test features, and get comfortable at your own pace.
Mistakes happen during any migration. Checking your files early helps you catch problems before they become bigger issues.
Protect your investment right away. A good sleeve or case keeps your device safe from daily wear and accidental damage.
Remember that switching operating systems takes real adjustment. Your muscle memory needs time to reset for a new environment.
Stay patient with yourself during this transition. Most users feel comfortable within a few weeks of regular use.
The switch from Windows to Mac rewards people who take it step by step. You gain a smooth, connected ecosystem once everything settles into place.
Trust the process and lean on Apple’s tools. Migration Assistant, iCloud, and thoughtful setup choices make your transition easier than you expect.
Your new Mac experience starts strong when you plan ahead. Take your time, stay organized, and enjoy exploring your new device.
Frequently Asked Questions
Can Migration Assistant transfer all my Windows files to Mac?
Migration Assistant transfers most of your important data. Your documents, photos, email accounts, contacts, and calendars move over smoothly. User account settings also transfer to your new Mac.
However, not all Windows applications work on macOS. The tool copies your programs over, but some won’t function on your Mac. You’ll need to find Mac versions or alternatives for incompatible software.
How long does the migration process take?
The time depends on how much data you have. A migration with hundreds of gigabytes can take several hours. Smaller transfers might finish in 30 minutes to an hour.
Keep both devices connected to power during the entire process. Don’t interrupt the transfer or close your devices. Patience during this step prevents data loss.
Do I need both computers during migration?
Yes, you need both your Windows PC and Mac present. Migration Assistant requires your Mac to display a code that you enter on your Windows PC. The two devices communicate over WiFi to transfer your files.
Make sure both machines stay on the same network. Keep them reasonably close together for a stable connection.
What should I do after migration completes?
Check your transferred files immediately after the process finishes. Open important documents and verify they’re intact. Test your email accounts to ensure they sync properly.
Explore your Mac’s keyboard shortcuts and trackpad gestures next. These differ significantly from Windows controls. Spending time learning them now speeds up your daily work later.

Dillip is the founder and editor of Switch & Size, where he breaks down tech products, accessories, and gadgets to help readers make smarter buying decisions. With a passion for testing and comparing the latest technology, he delivers honest reviews, in-depth guides, and side-by-side comparisons that cut through the marketing noise.